Administration
As a tranSMART User Administrator, your responsibilities include the following tasks:
- Adding new users to the tranSMART access list
- Granting permissions to users through role assignments and access rights to private Analyze studies
- Creating user groups, and assigning these groups access rights to private Analyze studies
- Creating and mapping user roles
- Setting up security for private Analyze studies
Important
This chapter is intended for tranSMART User Administrators only. Other users will not be able to see the controls or perform the tasks described in this chapter.
Administrator Privileges
In addition to performing administration tasks, you, as a tranSMART User Administrator, are a tranSMART super-user with access privileges to all tranSMART data sources, including all Analyze studies and both public and private gene signatures. You also have access to the tranSMART access log.
tranSMART user administrators are assigned the role ROLE_ADMIN.
The Administrator’s Console
To access the console where you perform administrator tasks, click the Admin menu:

On initialization, the administrator’s console displays the tranSMART access log:
Tasks in the Administrator’s Console
The tasks you can perform as administrator are listed vertically along the left edge of the administrator’s console. The following table summarizes these tasks.
Note
The Secure Object Paths and Add Study tasks are no longer used. While these tasks remain on the Administrator’s console at this time, they are not available for use nor are they addressed in any way.
| Category | Task | Description |
|---|---|---|
| Access Log | View Access Log | Display the tranSMART access log. |
| Groups | Group Lis t | List all user groups and edit or delete groups. |
| Create Group | Create a user group. | |
| Group Membership | Add users to a group or remove users from a group. | |
| Users | User List | List all tranSMART users or edit or delete users. |
| Create User | Create a tranSMART user. | |
| Galaxy Users | User List | List of tranSMART users who can export data to Galaxy via the Galaxy Export tab. |
| Create User | Associate a tranSMART user ID with a Galaxy key. | |
| Access Control | Access Control by Group | Grant users and groups access privileges to private Analyze studies, or remove access privileges for users and groups. |
| Access Control by Study | Grant users and groups access privileges to private Analyze studies, or remove access privileges for users and groups. | |
| Study | Study List | List the Analyze studies that are protected by access control. |
| Add Study | Not used | |
| Secure Object Paths | SecureObjectPath List | Not used |
| Add SecureObjectPath | Not used | |
| Roles | Role List | List all tranSMART roles and edit or delete roles. |
| Create Role | Create a tranSMART role. | |
| RequestMap Setup | Requestmap List | Display mappings between tranSMART roles and the tranSMART URLs that each role grants access to, and edit or delete mappings. |
| Requestmap Create | Create a mapping between a role and a tranSMART URL. | |
| Package | Build Information | View details about the current tranSMART build. |
Managing tranSMART Users
Managing users involves the following tasks:
- Creating user accounts
- Editing and deleting user accounts
- Assigning users roles
- Assigning users and groups access rights to private Analyze studies
Understanding User Roles and Access Rights
Users are granted permissions to access private Analyze studies in two ways:
- Through roles
- Through the access level assigned to the user or group for a private study
For information about access levels, see Access Levels.
User Roles
When you create or edit a user account, you can assign the user one or more of the roles in the following table.
For information on creating or editing a user account, see Managing User Accounts.
| Role | Permissions |
|---|---|
ROLE_SPECTATOR |
tranSMART Search
Analyze
Notes:
|
ROLE_STUDY_OWNER |
tranSMART Search
Analyze
Note: Private studies are categorized by Centers (CBER, CDER, and CDRH). The role STUDY_OWNER applies at the Center level. For more information, see Access Levels on page 153. |
ROLE_DATASET_EXPLORER_ADMIN |
tranSMART Search
Analyze
Note: The Analyze administrator has no user administration permissions. |
ROLE_ADMIN |
tranSMART Search
Analyze
User Administration
|
ROLE_PUBLIC_USER |
tranSMART Search
Note: This is a limited access role used for trainee accounts. |
Note
For information about creating new roles that you can assign to users, see User Roles on page 138.
Access Rights to Analyze Studies
Analyze studies can be either public or private. Public studies are in the Public Studies folder of the Analyze navigation tree. All other studies are private.
Access rights to public and private studies are as follows:
- Public studies: All tranSMART users have full access to the studies in the Public Studies folder. No access level is required for these studies.
- Private studies: By default, tranSMART users cannot access private studies. To allow a user to make comparisons between cohorts in a private study, you must grant the user access rights to that particular study.
If a user does not have access rights to a particular private study, the study is grayed out when the user displays the list of studies in the Analyze navigation tree.
Note
Even if the user does not have access rights to a private study, he/she can see a description of the study by right-clicking the study name in the navigation tree and then clicking Show Definition.
Managing User Accounts
Creating a User Account
To create a user account:
Click the Admin menu to display the administrator’s console.
Under Users, click Create User.
The Create User window appears:
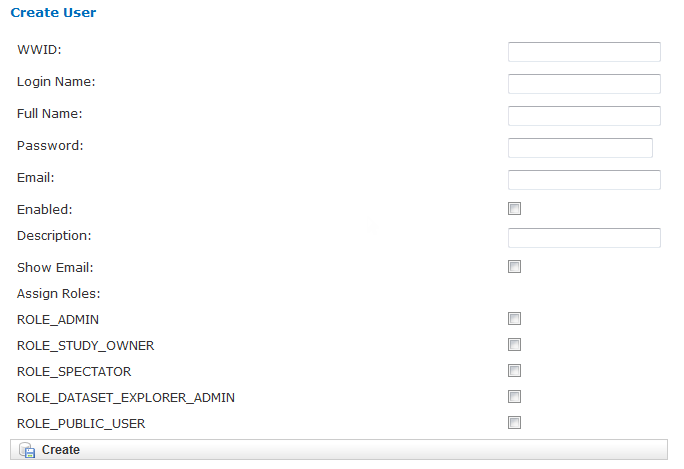
Provide values for the fields in the Create User window, as follows:
Field Description Required WWID Unique database identifier. Yes Login Name The user’s login ID. Yes Full Name The name to display in the tranSMART window for this user. Yes Password The user’s password. Yes Email The user’s email address. No Enabled Check this box to enable the user to log into tranSMART. If you leave the box blank, the user’s account is disabled, and the user will not be able to log into tranSMART. No Description An optional description of the user.
The description appears in the user list (displayed with the User List task in the administrator’s console).
No Show Email Check this box to display the user’s email address.
Note: The email display functionality is reserved for future use. Currently, the user’s email address is displayed only when you or another User Administrator view or edit a user’s account.
No Assign Roles Assign one or more roles to the user by checking the boxes next to the names of the roles to assign.
If you do not check any of the boxes, the user will not be able to log into tranSMART.
Note: For information about the roles you can assign to the user, see the section User Roles on page 138.
Yes When you are finished defining the user account, click Create.
Editing or Deleting a User Account
To edit or delete a user account:
Click the Admin menu to display the administrator’s console.
Under Users, click User List.
The AuthUser List window appears.
Click the column heading Full Name to sort the list of user names alphabetically.
Sorting the list may help you find the name in the list of users.
Note
You can sort any of the columns in the AuthUser List by clicking the column heading.
Locate the name of the user whose account you want to edit or delete.
Click Show for the account to edit or delete.
The User window appears.
Take one of the following actions:
- To delete the account, click Delete. Then click OK to confirm the deletion.
Important
Deleting a user account does not delete the user’s records in the access log. |
Records of Analyze studies are independent of any associated user account. For example, if a user is the owner of a particular study, the study remains in Analyze after the user is deleted, even if no other user has access privileges for the study.
- To edit the account, click Edit. After making the edits, click Update.
Managing Galaxy Users
tranSMART users who have the Dalliance Galaxy data analysis tool installed and configured for use with tranSMART can export data from tranSMART directly into Galaxy. To enable this feature for Galaxy users, you must associate their tranSMART user ID with their Galaxy key.
Click the Admin menu to display the administrator’s console.
Under Galaxy Users, click Create User.
The Create User window appears.
Provide values for all the fields in the Create User window, as shown below:
Field Description Username of User The user’s tranSMART user ID. Galaxy Key The user’s Galaxy key. Email The user’s email address. Click Create.
View or Delete Galaxy Users
To view the list of Galaxy users or to delete a Galaxy user:
Click the Admin menu to display the administrator’s console.
Under Galaxy Users, click User List.
The Galaxy User List window appears.
To delete a user as a Galaxy user, click Delete to the right of the user’s row.
Managing tranSMART Roles
A role is mapped to one or more tranSMART URLs. Each URL provides access to a tranSMART resource.
If a user is assigned a particular role, the user is able to access the URL mapped to the role, and therefore, to the resource available through the URL.
For example, the role ROLE_ADMIN is mapped to the URL pattern
/authUser/** on the tranSMART site. At this location, users assigned
ROLE_ADMIN (that is, administrators like yourself) can view, create,
edit, and delete tranSMART user accounts.
A URL pattern can be mapped to one or more roles. Since /authUser/**
is mapped to no other role than ROLE_ADMIN, only users assigned this
role can perform tasks on user accounts.
Understanding Role / URL Mappings
Roles are mapped to URLs on the Requestmap List window of the administrator’s console:
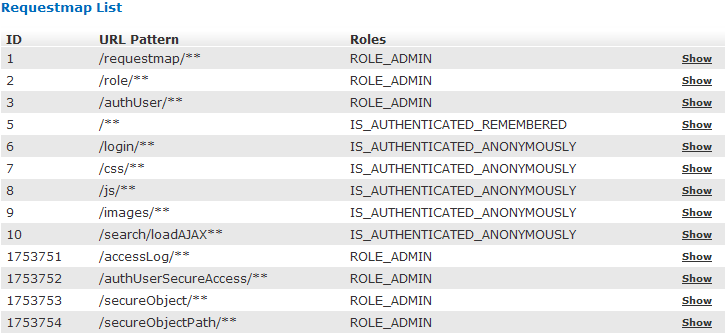
URLs in this window are expressed as fragments of URLs called URL
patterns. tranSMART determines the full URL to associate with a role by
adding the URL pattern to the root URL for the tranSMART site. For
example, if the tranSMART root URL is
https://transmart.mysite.com/transmart and the URL pattern is
/authUser/**, the complete URL mapped to the role ROLE_ADMIN is the
following:
https://transmart.mysite.com/transmart/authUser/**
The request map supports the ** pattern-matching characters. For example, in the above URL, the URL pattern /authUser/** matches both of the following URLs:
| URL | Purpose |
|---|---|
| https://transmart.mysite.com/transmart/authUser/list | View, edit, and delete tranSMART users. |
| https://transmart.mysite.com/transmart/authUser/create | Create tranSMART users. |
Default Role / URL Mappings
The following table describes the pre-defined mappings between tranSMART roles and URL patterns:
| URL Pattern | Mapped Role | Purpose |
|---|---|---|
| /accessLog/** | ROLE_ADMIN |
View the tranSMART access log. When you click the Admin menu to access the administrator’s console, the log is displayed by default. |
| /authUser/** | ROLE_ADMIN |
Create, view, edit, and delete tranSMART users. Currently, only tranSMART administrators can perform these tasks. |
| /role/** | ROLE_ADMIN |
Create, view, edit, and delete tranSMART roles. Currently, only tranSMART administrators can perform these tasks. |
| /requestmap/** | ROLE_ADMIN |
Create, view, edit, and delete mappings between roles and URLs. Currently, only tranSMART administrators can perform these tasks. |
| /authUserSecureAccess/** | ROLE_ADMIN |
Create, view, edit, and delete a user’s access rights to specific clinical trials. |
| /secureObject/** | ROLE_ADMIN |
Create, view, edit, and delete IDs and other attributes of a clinical trial. |
| /secureObjectPath/** | ROLE_ADMIN |
No longer used. |
| /** | IS_AUTHENTICATED_REMEMBERED |
Attempt to access any tranSMART URL. Note that:
|
| /login/** | IS_AUTHENTICATED_ANONYMOUSLY |
These URLs can be accessed by anyone. |
| /css/** | IS_AUTHENTICATED_ANONYMOUSLY |
|
| /js/** | IS_AUTHENTICATED_ANONYMOUSLY |
|
| /images/** | IS_AUTHENTICATED_ANONYMOUSLY |
|
| /search/loadAJAX** | IS_AUTHENTICATED_ANONYMOUSLY |
Note
The roles IS_AUTHENTICATED_REMEMBERED and IS_AUTHENTICATED_ANONYMOUSLY cannot be
edited, deleted, or explicitly assigned to users.
Managing User Roles
Note
In some cases, application development may be required to support role-based functionality.
Creating a Role
To create a tranSMART user role:
Click the Admin menu to display the administrator’s console.
Click Create Role.
The Create Role window appears.
In Role Name, type a name for the role.
Role names must be upper case and must be prefixed with
ROLE_— for example: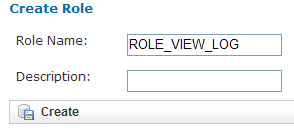
Note
In this example, a user assigned the role ROLE_VIEW_LOG can view
the access log on the administrator’s console but cannot perform any
of the other tasks on the console.
In Description, type a description for the role.
A description is required.
Click Create.
You must now map the role to a URL. Choose one of the following actions:
Adding a Role to an Existing Request Map
If the administrator’s console isn’t already displayed, click the Admin menu to display it.
Click Requestmap List.
Click Show for the mapping to which you want to add a new role:

Click Edit.
In Roles (comma-delimited), type a comma and a space character after the rightmost role in the field, then type the name of the role to add to the map.
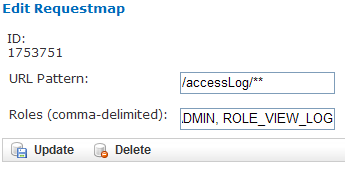
Click Update.
Creating a New Request Map
- If the administrator’s console isn’t already displayed, click the Admin menu to display it.
- Click Requestmap Create.
- In URL Pattern, type the URL pattern to map to a role.
Note
Double-check your entry to ensure that the URL exists. tranSMART does not validate the entry.
In role (comma-delimited), type the role name in upper case.
If you are mapping multiple roles to the URL, separate the role names with a comma.
Click Create.
Assigning a Role to a User
You assign a role to a user when you create or edit the user’s account. For instructions, see Managing User Accounts on page 140.
Editing or Deleting a Role
To edit or delete a role:
- If the administrator’s console isn’t already displayed, click the Admin menu to display it.
- Click Role List.
- Click Show for the role to edit or delete.
- Take one of the following actions:
- To delete the role, click Delete. Then click OK to confirm the deletion.
- To edit the role, click Edit. After making the edits, click Update.
Editing or Deleting a Request Map
To edit or delete a mapping between a role and a URL:
- If the administrator’s console isn’t already displayed, click the Admin menu to display it.
- Click Requestmap List.
- Click Show for the map to edit or delete.
- Take one of the following actions:
- To delete the map, click Delete and then click OK to confirm the deletion.
- To edit the map, click Edit. After making the edits, click Update.
Accessing the Administrator’s Console
There are two ways for a user to attempt to access the administrator’s console:
Click the Admin menu on the tranSMART window (see The Administrator’s Console).
The Admin menu is displayed only for users who are assigned the role
ROLE_ADMIN.Enter the complete URL for the administrator’s console:
https://transmart.mysite.com/transmart/accessLog/list
Partial Administrator Rights
If a user is assigned a role that is mapped to one of the tasks on the administrator’s console, that user can access the console and click on all of the links to administrator tasks. However, the only task the user will be allowed to perform is the one authorized through a role.
For example, suppose you create the role ROLE_VIEW_LOG to allow a user
to view the tranSMART access log. A user with this role can view the log
by entering the full URL for this administrator task — for example:
https://transmart.mysite.com/transmart/accessLog/list
However, if the user clicks on any of the other links on the administrator’s console, the access-denied message is displayed.
Managing Security for Analyze Studies
Users are able to perform operations with private Analyze studies only if you or another administrator grant the user (or a group that the user belongs to) access rights to do so.
Before you can assign a user or a user group access rights to a protected study, the following tasks must be performed:
- The study must be loaded into a database server.
- You must protect the study by defining it as a secure object, using the tranSMART administrator’s console.
If tranSMART is deployed on multiple servers, this step must be performed on each server separately, after the study has been loaded to the corresponding database server.
Securing a Study
When a study is loaded, the data loader indicates whether the study is
to be secured. Depending on its status, the study is created (secured)
in or removed (not secured) from BIOMART.BIO_EXPERIMENT as well as
these security concepts:
SEARCHAPP.SEARCH_SECURE_OBJECTI2B2DEMODATA.PATIENT_TRIALI2B2DEMODATA.OBSERVATION_FACT
If the Add Study option doesn’t perform this step, the application should be changed to do so or the Add Study option should be removed.
You can also run the stored procedure I2B2_SECURE_STUDY, after a study
is loaded, to add or remove security.
Managing Groups
Access privileges for a study can be assigned to users individually or to a group of users. Assigning access privileges to a group of users can be more convenient than assigning privileges individually.
Creating a Group
To create a group:
Click the Admin menu to display the administrator’s console.
Click Create Group.
The following window appears:
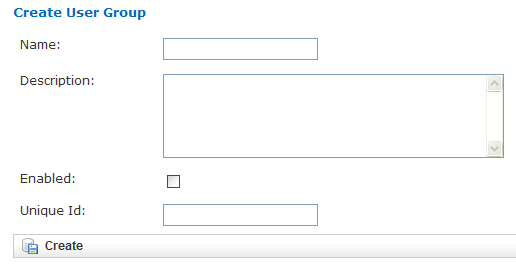
In Name, assign a name to the group.
Optionally, in Description, type an optional description of the group.
To enable the group’s privileges, select Enabled.
Leave Unique ID blank. A unique ID will be assigned to the group.
Click Create.
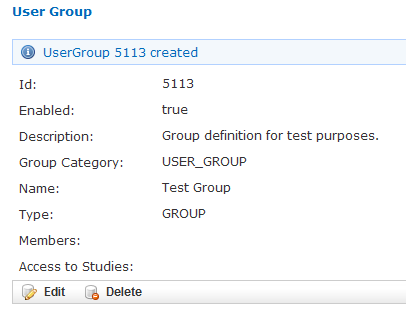
In the following figure, the group Test Group has been created. Note that it currently has no members or privileges to access any studies.
Managing a Group’s Users
To add users to a group, or remove users from a group:
Click the Admin menu to display the administrator’s console.
Click Group Membership.
The following window appears:
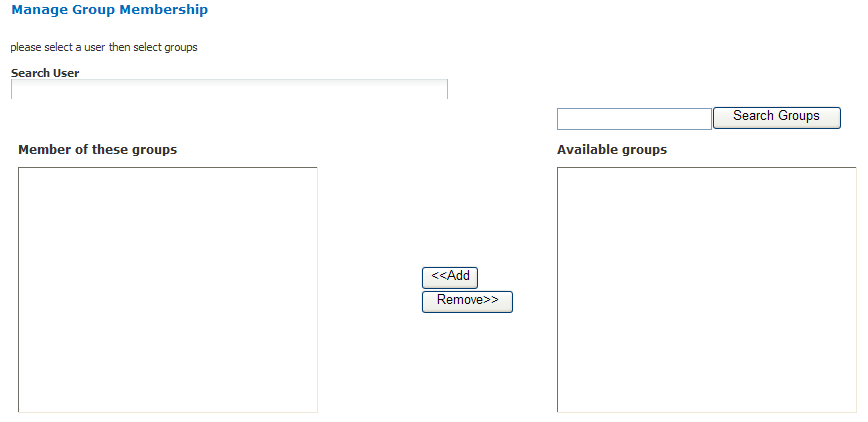
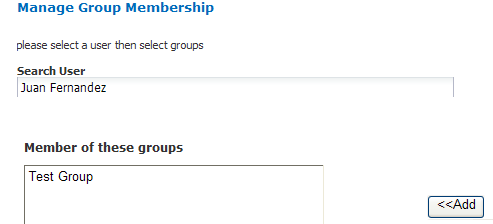
In Search User, type part or all of a user name, then select the name from the autotype dropdown.
Next you will specify the group that the user is being added to or removed from.
Click Search Groups.
The list of the available groups appears in the Available groups box.
Click the group name, then click Add to add the user to the group, or Remove to remove the user from the group.
In the figure below, the specified user has been added to the group Test Group:
Click another administrative task, or leave the administrator’s console. No Save action is required.
Editing or Deleting a Group
To edit or delete a group:
Click the Admin menu to display the administrator’s console.
Click Group List.
Click the ID of the group to edit or delete.
In the User Group window, click Edit or Delete:
- If editing, make the changes and click Update.
You may need to scroll down to the bottom of the window to see the edit fields.
- If deleting, click Delete, then click OK to confirm the deletion.
Managing Access Privileges
You assign a user or group access privileges to a study by assigning the user or group a particular access level for the study. Access levels determine the kinds of operations that the user can perform when accessing the study.
Access Levels
Individual users and groups of users can be assigned the following access levels for a study:
| Access Level | Description |
|---|---|
| OWN | User is the owner of the study with full access privileges. |
| EXPORT | User is not the owner of the study, but the user can define cohorts and points of comparison from the study. The user can also export all generated summary statistics and comparison data to a Microsoft Excel spreadsheet. |
| VIEW | User is not the owner of the study, but the user can define cohorts and points of comparison from the study. However, the user cannot export any data. |
Managing Access Privileges for a User or Group
In the Manage Study Access for User/Group window, you can perform the following tasks:
- Assign or remove access privileges to one or more studies for a user or group.
- Assign the access level for the access privileges.
To assign a user or group access privileges for a study:
Click the Admin menu to display the administrator’s console.
Click Access Control by Group.
The following window appears:
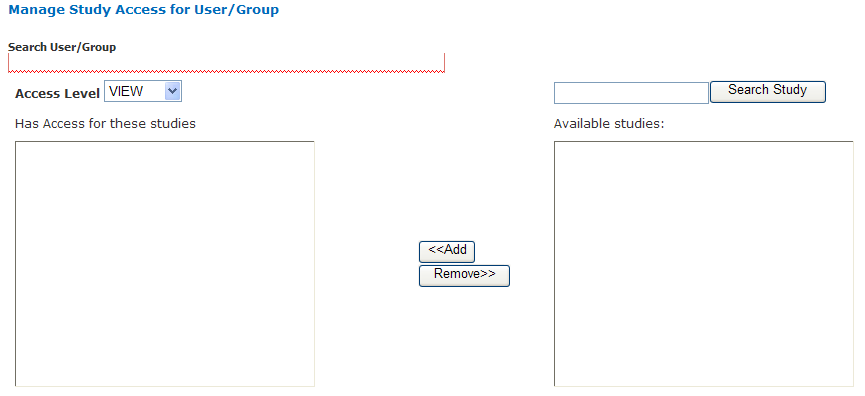
In Search User/Group, type part or all of a user or group name, then select the name from the autotype dropdown.
In the Available studies box, select one or more studies that the members of the group can access, then click Add.
In Access Level, select the access level (VIEW, EXPORT, OWN), to give to the members of the group for the selected studies.
For descriptions of these access levels, see Access Levels.
Click another administrative task, or leave the administrator’s console. No Save action is required.
If you now click Groups > Group List, and then click the ID of the new group you created in Creating a Group, you will see the members of the groups the studies to which the members have access privileges, and the access level for each study.
Managing Access Privileges for a Study
In the Manage Study Access window, you can perform the following tasks:
- Assign or remove access privileges to one or more users or groups for a secure object (such as a study or an entire study category).
- Assign the access level for the access privileges.
To grant access privileges to a study:
Click the Admin menu to display the administrator’s console.
Click Access Control by Study.
The following window appears:
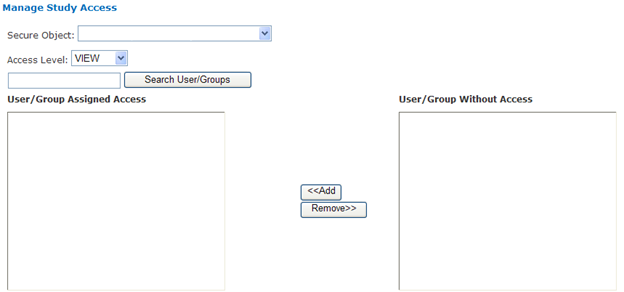
In Secure Object, select the study or study category to which access is being granted.
In the User/Group Without Access box, select the users and/or groups who can access the secure object, then click Add.
In Access Level, select the access level (VIEW, EXPORT, OWN) for accessing this secure object by the selected users/ groups.
For descriptions of these access levels, see Access Levels.
Click another administrative task, or leave the administrator’s console. No Save action is required.
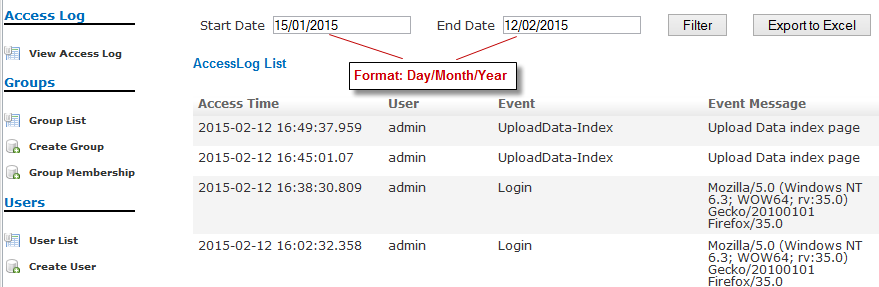
Viewing the tranSMART Access Log
The Access Log lets you view tranSMART events such as logins, logouts, searches, and Analyze analyses. For each event, the log notes the time and date of the event and the user who performed the operation.
The access log displays events beginning with the most recent.
Displaying the Access Log
When you open the administrator’s console, the log is displayed by default.
If you are in a different window of the administrator’s console and want to display the access log, click View Access Log.
Exporting the Access Log to a Spreadsheet
To export the access log to a Microsoft Excel spreadsheet:
- With the access log displayed, click Export to Excel.
- Specify whether you want to display the access log within a spreadsheet, or immediately save the spreadsheet to a file.
Specifying the Timeframe for the Access Log
By default, the log shows all events, starting with the most recent event and extending back to show one week before the end date.
You can specify a particular timeframe for the events you want to display or export.
To specify a timeframe:
With the access log displayed, type the date of the earliest events to display in the Start Date text box.
Date format is dd/mm/yyyy.
Alternatively, select the start date from the calendar that appears when you place the mouse pointer inside the Start Date or End Date text box.
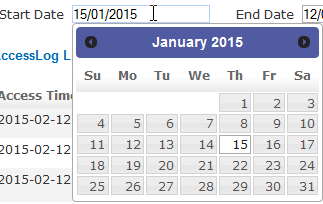
Repeat Step 1 for the End Date field.
Click Filter.
All events within the specified timeframe display.
Note
If the End Date is before the Start Date, the event list contains no entries.
Browse Tool Administration
This section describes how to create and modify the following objects in the Browse Program Explorer:
- Programs
- Studies
- Analyses
- Assays
- Folders
For descriptions of these objects, see Viewing Studies in the Program Explorer Tree.
Creating Program Explorer Objects
A program is the highest-level object in the Program Explorer tree. The procedure for creating a program is different than for creating all other objects.
Creating a Program
To create a program in the Program Explorer:
Click Browse in the tranSMART menu bar.
Click Add new program under the Welcome to tranSMART box:
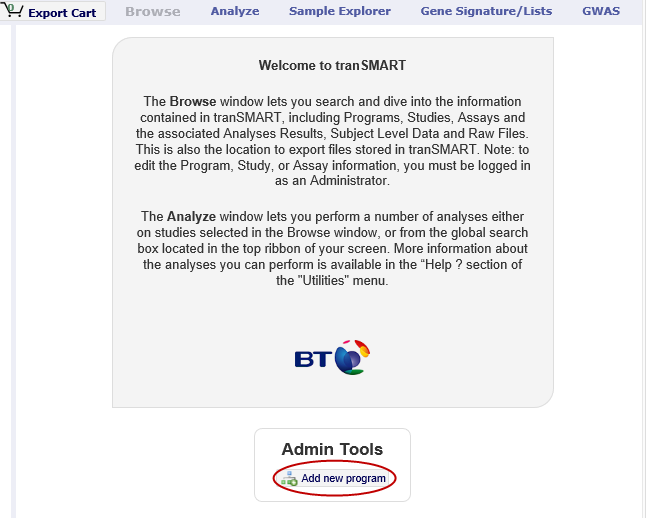
Define the fields in the Create Program dialog box, then click Save.
Creating Other Program Explorer Objects
Studies, analyses, assays, and folders are child objects of some other object. For example, you can create a study under a program, an analysis under a study, or a folder under an analysis or another folder.
To create a child object:
Select its parent object in the Program Explorer.
The child objects that can be created under the parent appear as buttons in the upper-right corner of the Browse window; for example:

Click the appropriate button to open the Create… dialog box.
Define the fields in the Create… dialog box, then click Save.
The following table shows the objects you can create for a selected object in the Program Explorer:
| Selected Object in Program Explorer | Child Objects You Can Create |
|---|---|
| Program |
|
| Study |
|
| Analysis |
|
| Assay |
|
| Folder |
|
Editing and Deleting Objects
The following table describes how to edit and delete Program Explorer objects:
| Task | Description |
|---|---|
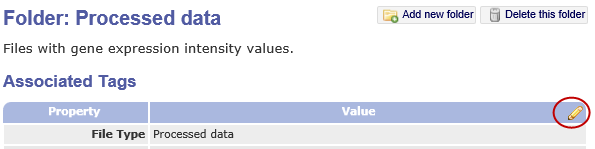
| Editing an object | To edit an object, click the object in the Program Explorer, then click the pencil icon that appears in the Browse window:
Define the fields in the Edit… dialog box, then click Save. |
| Deleting analyses, assays, and folders | To delete an analysis, assay, or folder, click the object in the Program Explorer, then click the Delete this… button in the upper right corner of the window; for example:
Note: Only analyses, assays, and folders can be deleted from within the Browse window. Programs and studies must be deleted from the database directly. |
| Deleting files | To delete a file from a folder, click the folder in the Program Explorer, then click the Delete button at the right:
|


Common Features for Creating and Editing Objects
The following table shows the features that apply to all Program Explorer objects when you are creating or editing an object in a Create… or Edit… dialog box:
| Feature | Description |
|---|---|
| Required fields | Fields whose names are followed by a red asterisk are required:
|
| Autocomplete fields | Shaded fields are autocomplete fields. Type one or more characters at the beginning of the value that you want to assign to the field, and tranSMART will display a list of text strings that begin with those characters. Select the value to assign from the displayed list.
Alternatively, insert the cursor in the field and press the Down arrow key to select from an alphabetical list of suggested field values. |
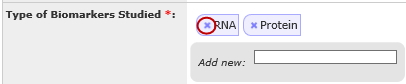
| Multiple-value fields | Some autocomplete fields allow multiple values to be assigned. These fields contain the label Add new next to the field.
|
| Removing a value from a multi-value field | To remove a value from a multi-value field, click the blue x icon next to the value:
|
| Close vs. Cancel buttons | Both buttons close the Create… or Edit… dialog box, and any changes you made in the dialog box are abandoned. However, with Cancel, a warning message appears before the dialog box is closed. With Close, the dialog box is closed immediately with no warning message. |


Uploading Files to Folders
Folders allow you to attach files to an object. For example, you might add a folder to contain files pertaining to the analysis of a study, or a gene list for an analysis.
You can upload any type of file to a folder. However, the free-text search feature will only search files in a format that can be text-indexed, such as Microsoft Word documents, text files, and electronically generated PDFs.
Files can be uploaded to a folder via FTP and can be stored on the application server.