Browse
Important
This tab is not always activated. It might not appear in your tranSMART environment.
The tranSMART Browse feature provides a fine-grained search capability from a single user interface into studies and other data sources of interest.
You define a search query by: typing search keywords into the text box, selecting pre-defined search filters from one or more filter browsers, or any combination of these methods. tranSMART conducts the search across multiple data sources.
The Browse feature supports filters based on one or more of the following kinds of information:
- Keywords that you specify, such as part of a study or analysis name
- Reference SNP (RS) identifiers
- Individual genes and all genes in a gene signature
- Chromosomes and a specific position within a chromosome
- Diseases and observations
Note
Administrators only: For information on creating and editing Browse objects, see Browse Tool Administration.
Overview of the Browse UI
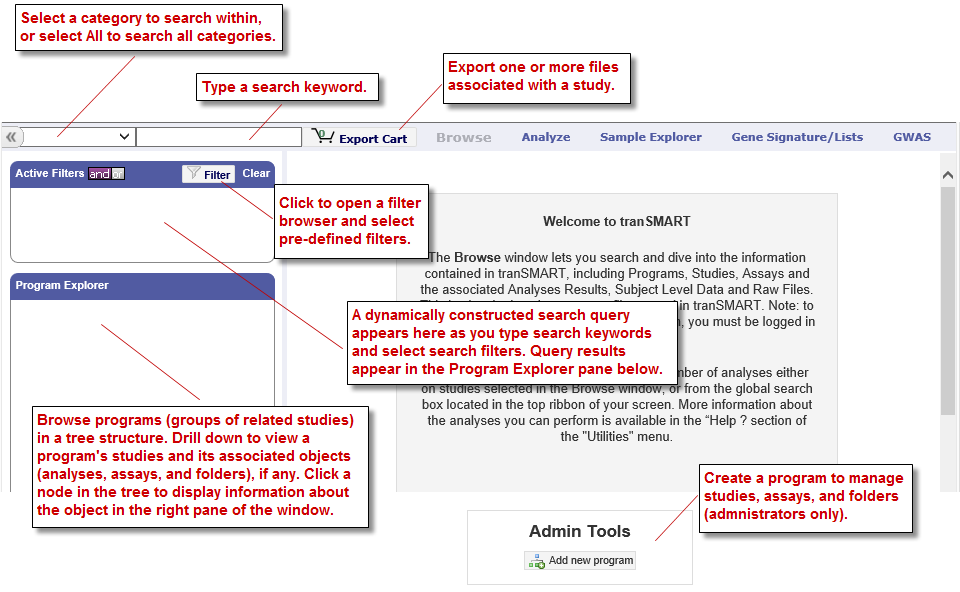
The figure below shows the Browse interface. It is divided into two panes:
Left pane
Here the search filters are defined to retrieve the studies of interest.
The “Active Filters” area displays any selected, pre-defined filters and free-text search keywords that you have typed; for example, the title of a study. The “Program Explorer” area displays the matching studies.
Right pane
Here information is shown on the studies and any associated objects (analyses, assays, folders) listed in the Program Explorer.
Some studies displayed in this pane can be opened in the “Analyze” feature, where you define cohorts within the study and perform a variety of analyses of the cohort data.
Features of the Browse page are shown below:
Defining Search Filters
You define search filters to retrieve just the resources that interest you.
Search filters are identical in the Browse and Analyze windows. When you define a filter, it will be applied in Browse and in Analyze.
This section describes how to use keywords as search filters, using the boxes above the Active Filters area, and how to select pre-defined search filters from the Filter Browser.
The search filters you type and that you select from the Filter Browser are displayed in the Active Filters.
Keyword Search
The following figure shows the controls for defining a keyword search:

There are two types of keyword searches:
- Keyword searches based on dictionaries. These searches apply to all categories of pre-defined metadata, such as Disease.
- Keyword searches based on free-text fields, such as names and descriptions, as well as file names and content (for indexed files). In Analyze, free-text searches apply to all tree nodes in the Navigate Terms pane.
To define a keyword search (any category except Free Text):
- Select one of the categories in the category dropdown control, or select All to search across all categories.
- Specify part or all of a search keyword in the text field to the right of the category dropdown.
Note
Gene searches return all matches of the gene, not just results that are statistically significant.
When you type at least two characters in the field, tranSMART begins to search within the specified category and lists keywords that begin with those characters. The search text is not case sensitive.
The following figure shows a list of the keywords displayed when the characters il7 are typed and the category Gene is selected:

Up to 15 keywords can be displayed at one time. If you don’t see the one you want, type more characters into the field.
Note that the search looks for matches based on the characters at the beginning of a keyword (in bold) or, as shown below, at the beginning of a keyword synonym (in parentheses).

Click the keyword you want, but do not press Enter or Return. When you click the keyword, the following actions occur:
- The search begins immediately. The contents of the Program Explorer are updated, and a result is displayed in the right pane.
- The search filter appears in the Active Filters area:
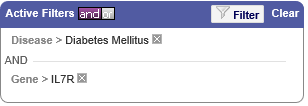
You can add more filters by repeating the steps above, by selecting filters from the Filter Browser, or by a combination of these actions.
Note
Search filters for SNPs, genes, and gene signatures do not filter out studies and analyses that omit the specified SNP or gene. However, the only records returned for an analysis are those that contain the specified SNP or gene. If an analysis contains no references to the SNP or gene, no records are returned for that analysis.
To define a Free Text keyword search:
- Select Free Text in the category dropdown control.
- Type the entire keyword (consisting of one or more words) and press Enter.
For example, after you type the following Free Text keyword and press Enter, tranSMART searches for data sources containing primary breast tumor but not those containing just breast tumor:

Using the Filter Browser
The Filter Browser lets you select one or more search filters to include in your search query.
tranSMART adds all of your search filters, including those you type into the keyword search field, into the Active Filters area.
To work with the Filter Browser:

- Click the filter icon in the Active Filters box
- A list of all filters from which you can select appears.
- Click the down arrow next to a filter type to see all available entries for that type.
- Select the filter(s) you want to use from the list. You can select more than one filter from the same filter type or filters from different types.
All selections appear in the Active Filters pane, along with any search keywords you might have specified.
Managing Active Filters
The Active Filters area displays the entire search query that you build using the keyword search feature and/or filter browser feature.
Each filter that you define is added to the search query. Each time you add a filter to the search query, the result set in the right side of the Browse page is modified to satisfy the entire search query.
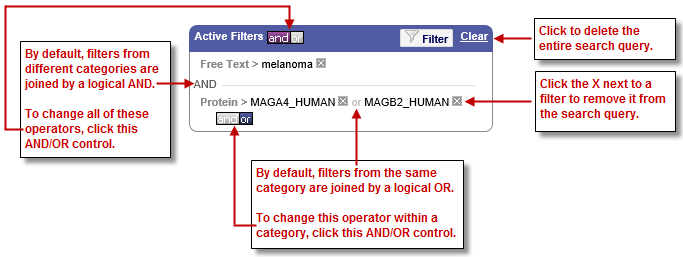
The following search query in Active Filters will return data sources involving melanoma and the human protein MAGA4 or MAGB2:
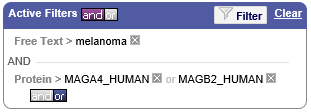
Note the following controls in the Active Filters pane:
Viewing Studies in the Program Explorer Tree
The Program Explorer displays the results of the search query in the Active Filters box. As the search query changes, the contents of the Program Explorer changes along with it.
Note
Administrators only: For information on creating and editing the objects in the Program Explorer, see Browse Tool Administration.
The following illustration shows the hierarchy of objects in the Program Explorer tree. Note that each node in the tree is associated with an icon that represents the type of object at that node:
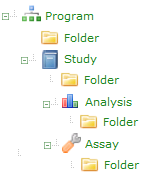
Program is the top-level component of the hierarchy whose purpose is to group related studies together. Most of the time a program is defined by a molecular target, but it may also be a disease or a pathway.
Study is a collection of subjects on which one or several assays were performed. It can be a clinical trial, a preclinical study, or a discovery experiment.
Note
Icons for studies that can be opened in Analyze view are designated by a yellow star ( |image21| ) on the icon.
Assay is an investigative procedure for qualitatively or quantitatively assessing the amount or functional activity of an entity. An assay is defined by a unique experimental protocol.
Analysis is a result obtained by analyzing data from a study. In most cases, an analysis is a signature; that is, a list of molecular entities affected by a particular experimental condition or phenotype.
Folders contain one or several files with information about the associated program, study, analysis, or assay.
Click an object name to view information about the object in the right pane of the Browse window.
Viewing and Exporting Files in Browse Folders
Folders are used to store any type of files. You can view and download files.
To view a file in a folder:
Click the folder name in the Program Explorer tree.
Information about the folder appears in the right panel, including a list of files in the folder.
Click the name of the file to view.
Files of common formats (such as .doc and .pdf) will be displayed in the corresponding application.
To export files click the Add to Export button at the far right of a file to export, or click Export all to export all files in the folder:
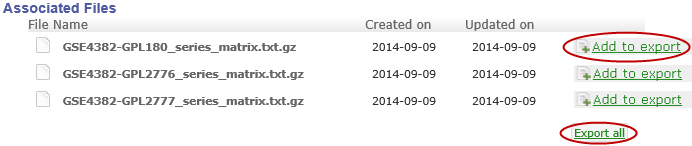
The files are not exported immediately. Instead, they are added to the Export Cart.
Optionally, as you continue to work in the Browse window, add files from other folders to the Export Cart.
When finished adding files to the Export Cart and ready to export the files, click the Export Cart button at the top of the Browse window:

In the Export Files dialog box, click Export Selected Files.
Important
tranSMART formats the file to export as a zip file, assigns it the name export.zip, and downloads the file to the Downloads directory on your computer.
If a file named export.zip already exists in the directory, tranSMART changes the name to export-1.zip (or export-2.zip, export-3.zip, und so weiter, depending on how many files have been exported previously).
If multiple files are selected for export on the Export Files dialog box, all are downloaded in one zip file.
Opening a Study in Analyze View
Some studies that have been selected in the Program Explorer tree can be opened in Analyze view. The icon for these studies is displayed with a yellow star ( |image24| ), as shown below:
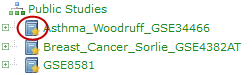
To open these studies in Analyze View, first click the study in the Program Explorer tree, then click the Open in Analyze view button as shown below:
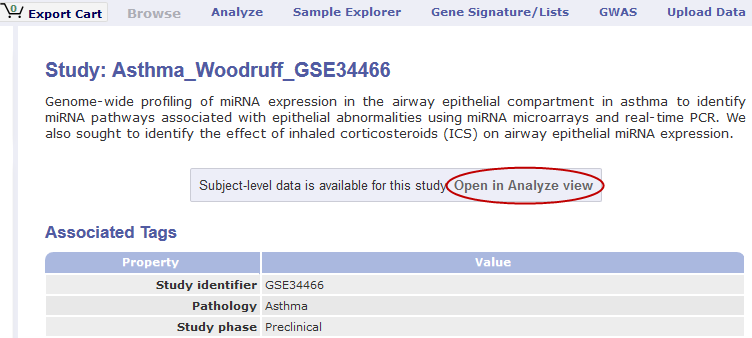
tranSMART displays the Comparison tab of the Analyze window and opens the study you were just viewing in the Browse window.
In both the Analyze and Browse windows, note that the study has been added to the Active Filters pane, and that the results of the search query are now restricted to that single study.