Gene Signatures & Lists
The tranSMART gene signature wizard guides you through the process of creating a gene signature or gene list. You specify whether the gene signature or list is publicly available to other tranSMART users or is reserved for your private use.
Once you create the gene signature or list, it can be used in tranSMART searches to find clinical studies and experiments where the differentially regulated genes overlap with the genes contained in the gene signature or list. This will generate a set of hypotheses about diseases or treatments that may have similar genes deregulated, and that can help you develop a further set of experiments.
Note
This chapter uses the term “gene signature” to refer to both gene signatures and gene lists.
Creating a Gene Signature
There are two basic tasks involved in creating a gene signature:
Add the list of genes for the gene signature to a text file.
Genes can be indicated by gene symbol or by their associated probe set ID.
Use the gene signature wizard to define the information on which the gene signature is based, such as species, source of data, and test type, and also to import into the gene signature definition the text file containing the genes.
Step 1. Adding the Genes to a Text File
The gene signature wizard expects to import the genes for the gene signature from a tab-separated text file. The file must contain one, and possibly two, columns of information:
- First column — A list of gene symbols or probe set IDs.
- Optional second column — The fold change ratios associated with the gene symbols or probe set IDs.
The fold change ratios can be either actual values (for example, 12.8 or -12.8) or one of the following composite values:
-1 All down-regulated gene expressions.
1 All up-regulated gene expressions.
0 No change.
The following table shows the different ways you can specify the genes for your gene signature :
| Contents of File | Format | Examples |
|---|---|---|
| Gene symbols only | GeneSymbol | TCN1 IL1RN KIAA1199 G0S2 |
| Gene symbols, actual fold change | GeneSymbol<tab>*ActualFC* | CXCL5 -19.19385797 IL8RB -18.21493625 FPR1 -17.6056338 FCGR3A -15.69858713 |
| Gene symbols, composite fold change | GeneSymbol<tab>*CompositeFC* | CXCL5 -1 IL8RB -1 MMP3 0 SOD2 1 |
| Probe set IDs only | ProbesetID | 224301_x_at 1398191_at Dr.2473.1.A1_at A_24_P93251 |
| Probe set IDs, actual fold change | ProbesetID<tab>*ActualFC* | 224301_x_at -19.19385797 1398191_at -18.21493625 Dr.2473.1.A1_at -17.6056338 A_24_P93251 -15.69858713 |
| Probe set IDs, composite fold change | ProbesetID<tab>*CompositeFC* | 224301_x_at -1 1398191_at 0 Dr.2473.1.A1_at 1 A_24_P93251 -1 |
Step 2. Creating the Gene Signature
To create a gene signature:
In tranSMART, click the Gene Signature/Lists menu.
Click the New Signature button.
The first page of the gene signature wizard appears:

Note
Required fields on gene signature wizard pages are marked with a red asterisk (*).
You can find additional information about the gene signature wizard by clicking Information on any wizard page.
Specify a name (required) and an optional description for your gene signature, then click Meta-Data to proceed to the next gene wizard page.
The second page of the gene signature wizard appears:
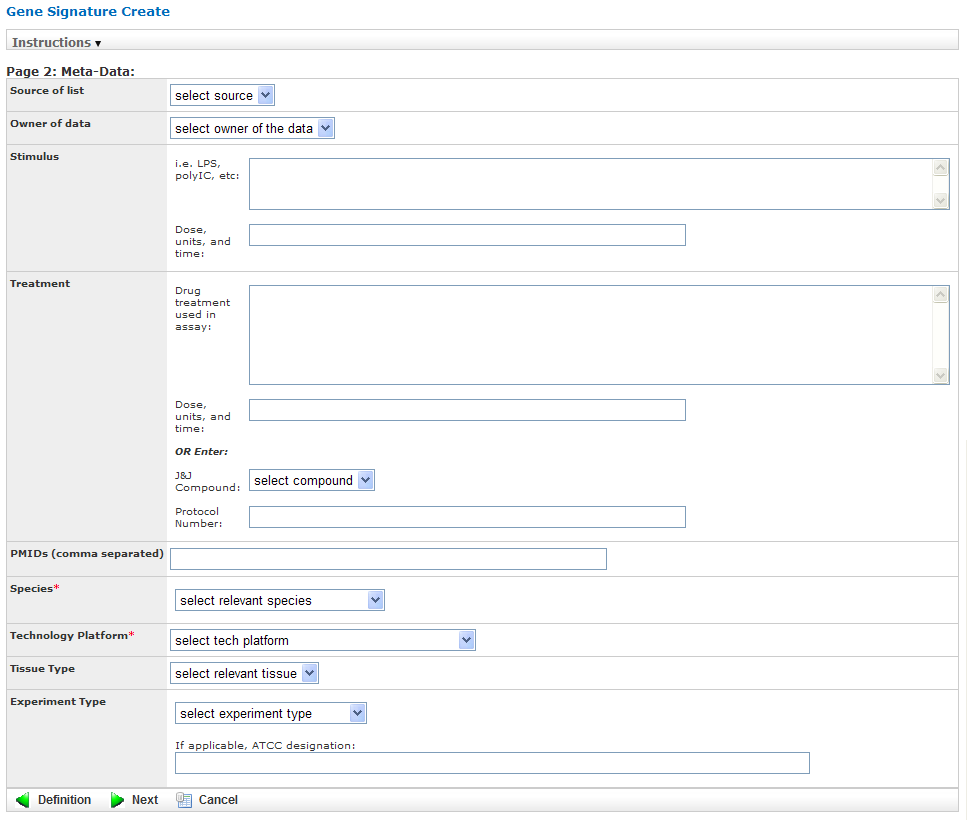
Specify values in the required fields Species and Technology Platform, and also in any other relevant fields, then click Next to proceed to the final gene signature wizard page:
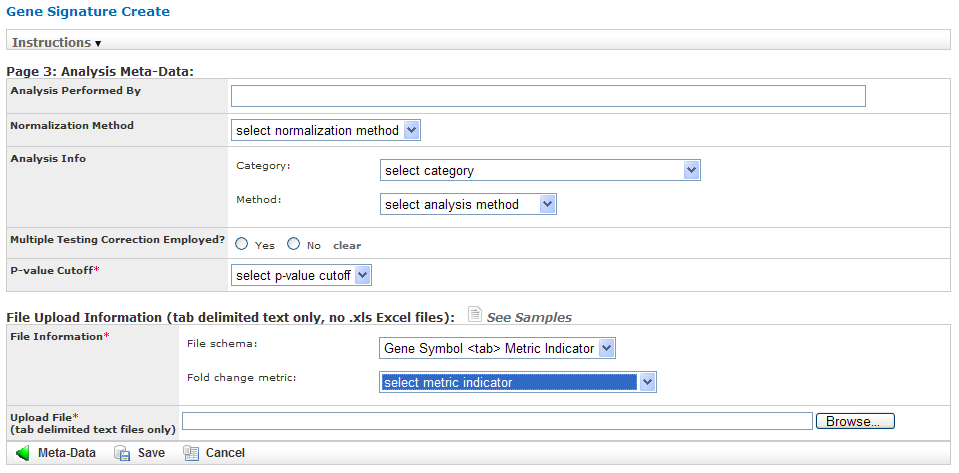
The third page appears.
Specify values in the required field P-value Cutoff.
In the section File Upload Information, describe the text file you created in the section Step 1. Adding the Genes to a Text File using the required fields File Information and Upload File:
In the File schema section of File Information, select Gene Symbol <tab> Metric Indicator or Probe Set Symbol <tab> Metric Indicator, depending on the method you chose to specify the genes.
In the Fold change metric section of File Information, select one of the following choices from the dropdown:
Fold Change Metric Indicator Description Actual fold change The text file contains actual fold change values for each gene symbol or probe set ID. Not used The text file contains gene symbols or probe set ID only. There are no associated fold change values. -1 (down), 1 (up), 0 (optional for unchanged) The fold change values are not actual values. They simply represent whether the gene expression was down-regulated (-1), up-regulated (1), or unchanged (0). In Upload File, specify the path and name of the file that contains the genes to import. Use the Browse button to select the file from the navigation tree.
Specify values in any other relevant fields on this gene wizard page, then click Save to save the gene signature.
The new gene signature appears in the Gene Signature List at the top of the Gene Signature/List view:

Making a New Gene Signature Public
By default, a newly created gene signature is private.
To make a gene signature public:
In the Gene Signature List, click the Select Action dropdown to the right of the gene signature you just created.
Click Make Public in the dropdown list:
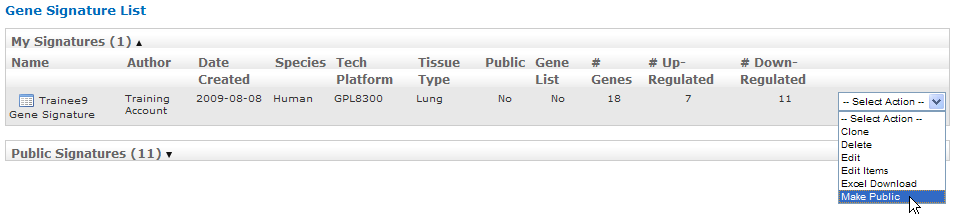
After you click Make Public, the value in the Public column for the gene signature changes from No to Yes:

Note
tranSMART users assigned the role ROLE_ADMIN have access to both public and private gene signatures.
Performing Actions on Your Gene Signatures
To edit or perform other actions on a gene signature in your gene signature list:
In tranSMART, click the Gene Signature/Lists menu.
The Gene Signature List appears, containing all the genes you have created:

Click the Select Action dropdown for the gene signature you are acting on. The dropdown contains all the actions you can perform on the gene signature:
Action Description Clone Create an exact duplicate of the gene signature definition (except for the text file containing the gene symbols and fold change values), and display the definition in the gene signature wizard.
Cloning a gene signature helps you create a new gene signature with a similar definition to an existing one. However, it is expected you will import a different set of genes into the gene signature.
Delete Delete the gene signature. Edit Open the gene signature in the gene signature wizard for editing.
The gene signature wizard displays all the information in the gene signature, including the reference to the text file containing the list of genes and fold change values. If you want to choose a different text file, click the following label:

To save any changes you make during editing, you must click the Save button on the third page of the wizard.
Edit Items Add, delete, or modify one or more genes in the text file containing the gene symbols and fold change values. Excel Download Generate the entire contents of the gene signature, including the information in the text file containing the gene symbols and fold change values, to a Microsoft Excel spreadsheet.
The gene signature definition and gene symbols/fold change values are written to separate spreadsheets.
Make Public Make a private gene signature public.
Note: To make a public gene signature private, edit the gene signature and set the Public? field to No on the first page of the gene signature wizard:

Performing Actions on Other Users’ Signatures
You can perform actions on gene signatures that other tranSMART users have created. The gene signatures you can access and the actions you can perform on them depend on the role assigned to your tranSMART user ID, as follows:
| Role | Authorized Actions |
|---|---|
| ROLE_ADMIN | All actions on all gene signatures, both public and private. |
| ROLE_SPECTATOR ROLE_STUDY_OWNER ROLE_DATASET_EXPLORER_ADMIN | Only Clone and Excel Download, and only on public gene signatures. |
To edit or perform actions on a gene signature other than your own:
In tranSMART, click the Gene Signature/Lists menu.
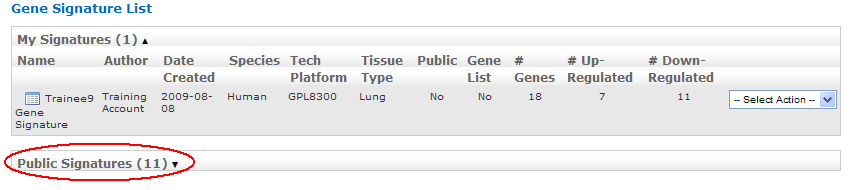
Click Public Signatures to open the list of public gene signatures:
Note
tranSMART users assigned the role ROLE_ADMIN will see Other Signatures instead of Public Signatures.
Click the Select Action dropdown for the gene signature you want to act on.
Select the action you want to perform on the gene signature.
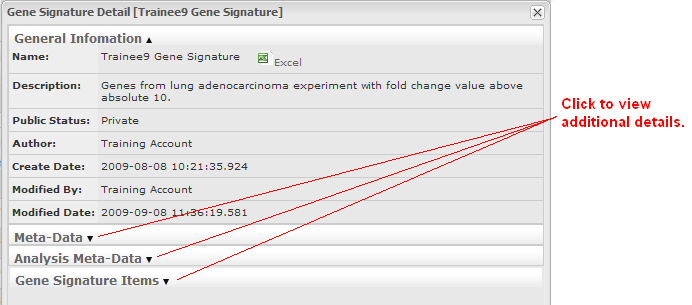
Viewing a Gene Signature Definition
You can view the definition of a gene signature, including its list of genes and fold change values, for any gene signature you are authorized to access.
To view a gene signature definition, click the Detail icon
( ) next to the gene signature name.
The Gene Signature Detail dialog box appears, containing the gene signature definition: